
Animating Text
Part 1
Create a new flash document.
Select the text tool and change the font to Arial, bold and 30.
Then in the middle of the screen type Hello Everyone. Then press Ctlt +B to break the text apart.
Next select modify / timeline / distribute to layers
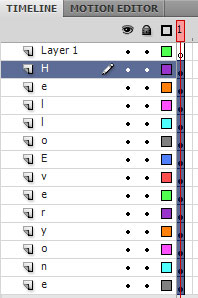
Select all the letters and then open the align panel. Select the to stage option and align vertical centre.

Your image should look like below.
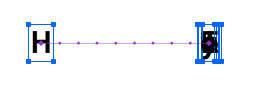
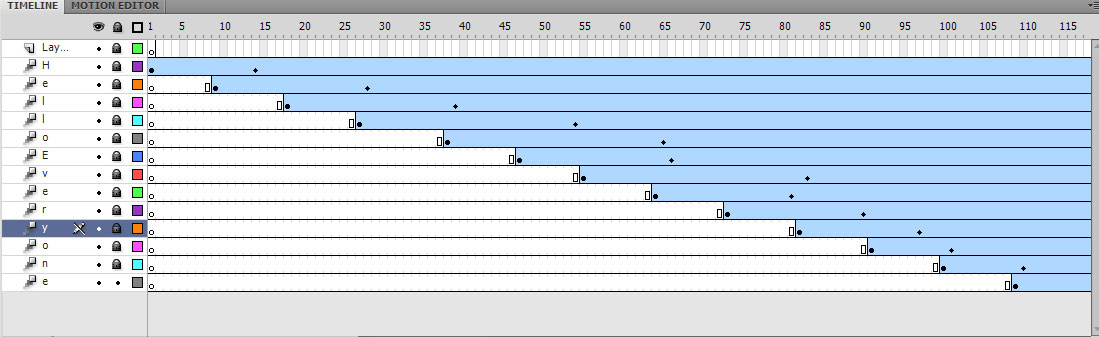
With all the layers still selected press insert / motion tween to create an animation on each layer. Lock all the layers except for the first H. Move the end frame to frame 10 to reduce the duration of the animation. On frame 10 drag the H to the left to create an animation.
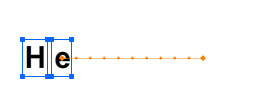
Then for the letter e, the animation should be from frame 9 to 19 and move the letter to just next to the H.

Repeat the process for the other letters. The finished timeline should look like below:
Control test movie to view the animation.
Part 2
Create a new flash document and select the text tool.
Change the font size to 36 in the properties panel ensure that the font is set to static text (also found in the properties panel) and then click on the stage and type ‘WELCOME’.
Ensure that the text is selected and then press F8 to convert to symbol. When the dialogue box appears type welcomeGr, set the type as Graphic and press ok. It needs to be a graphic so you can adjust the alpha of the symbol.
Insert a motion tween and leave it for the default duration.
In the motion editor , select the colour effect click on the + icon selecting alpha. Change the value to 100%.
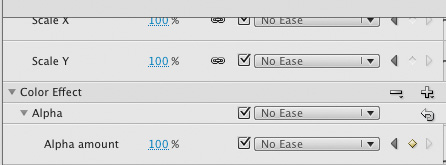
On frame 1 change the value is 0%.
Now control / test the movie to see the animation.
Exercise
Prevent the animation from looping round.
Part 3
Create a new flash document, click on the stage and open the properties panel and change the background colour to black.
Select the text tool.
Change the font size to 36 in the properties panel ensure that the font is set to static text (also found in the properties panel), font type ‘courier new’ colour to white and then click on the stage and type ‘WELCOME’.
Select frame 50 and then press F5 to insert frames from 1 to 50.
Create a new layer naming it textanimation and another new layer naming it actions.
Lock layer one and then select the textanimation layer. Select the rectangle tool and set the colour to black fill with no stroke. Draw a large rectangle that covers the entire text.
Ensure that the rectangle is selected and press F8 to convert it to a symbol.
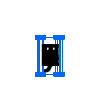
Give it a name of ‘mymask’, select type Movie Clip and then press ok.
Double click on the mymask on the stage to open its timeline.
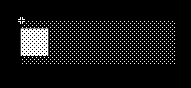
Then select the rectangle tool and draw a small white square over the left hand side of the rectangle as below.
Then insert a keyframe at frame 4 within this movieclip, and then select frame 6 and press F5 to insert a frame.
On frame 4 select the white square and open the properties panel to change the colour to black. From frames 4 to 6 you should just have a solid black rectangle.
Now click on scene 1 to return to the main time line.
You should be familiar with creating motion tweens by now!! Create a motion tween at frame 15 using the movie clip.
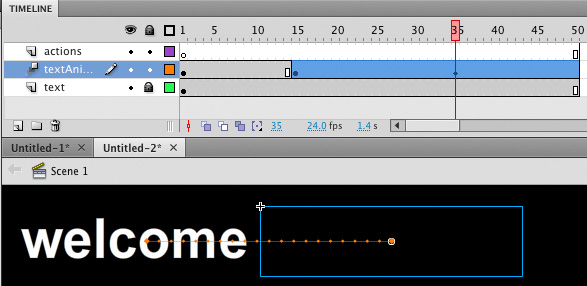
Ensure that all the text is covered by the movieclip and create your time line to match above. Note on frame 35 the movieclip is moved to the far right hand side to reveal all the text.
In the actions panel type:
stop();
is placed on frame 50 to prevent the play head looping around.
Control / Test Movie.
Save your work as type_text.fla.
Excercise
If you have completed this then the next stage is for you to try some other examples: Go to the friendsofed site download the tutorial files and the sample chapter. Note you only need the tutorial files for chapter 6.