
Creating a Button
Step 1
Create a new flash document. With the rectangle tool selected at the bottom of the tool panel alter the fill and stroke colours to a yellow for the fill and have no colour for the stroke.
Step 2
Now draw a small rectangle on the stage. Select the arrow tool from the tools panel and drag over the rectangle to select the image. If the whole image is selected then you should have little black dots on the image.
Step 3
Right click on the image and from the list choose convert to symbol.
You will be presented with three options: Movie Clip, Button, Graphic
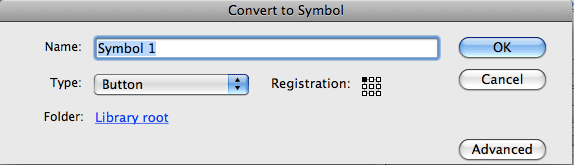
Select the button option and give it the name button1 and press ok. Notice how it has now disappeared from the screen you will find it in the library panel (in the right panels).
Step 4
Double click the button in the library panel and it will appear in the middle of the screen. At the top of the screen the timeline has now changed and presents you with four options, Up, Over, Down, Hit.
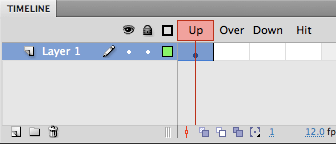
Up frame is the original representation of the button. If button is not pressed and not rolled over it will be displayed as it shown in "Up" frame. "Over" frame is used to make a rollover button representation. "Down" frame appears if button pressed and "Hit" is not visible but extremely important frame that shows actually the size of the button area on which you can click. By just placing an image in the hit area you can create invisible buttons that can be used when creating image maps etc.
Step 5
Insert keyframes in the Over Down Hit frames, right click in each of the frames and from the list select Insert Keyframes (F6). Now click in the Over frame (this will turn black to indicate that it has been selected. In the tools panel change the colour from yellow to orange. This will create a rollover effect when the mouse rolls over the button.
Step 6
Insert a new layer by pressing the insert layer icon found at the bottom left hand side of the timeline.
Select the text tool from the tools panel and in the type page 1 on the centre of the rectangle. You might have to change the colour of the text by opening the properties panel.
Your button should now be complete. Above the main timeline you will find two options select scene 1 and this will return you to the main movies time line, notice how the button is no longer on the screen.
![]()
The actionscript to add functionality will be covered later.